XXL-JOB-English-Documentation.md 35KB
《A lightweight distributed task scheduling framework. "XXL-JOB"》
1. Brief introduction
1.1 Overview
XXL-JOB is a lightweight distributed task scheduling framework, the core design goal is to develop quickly, learning simple, lightweight, easy to expand. Is now open source and access to a number of companies online product line, download and use it now.
1.2 Features
- 1.Simple: support through the Web page on the task CRUD operation, simple operation, a minute to get started;
- 2.Dynamic: support dynamic modification of task status, pause / resume tasks, and termination of running tasks,immediate effect;
- 3.Dispatch center HA (center type): Dispatch with central design, "dispatch center" based on the cluster of Quartz implementation, can guarantee the scheduling - center HA;
- 4.Executer HA (Distributed): Task Distributed Execution, Task " Executer " supports cluster deployment to ensure that tasks perform HA;
- 5.Task Failover: Deploy the Excuter cluster,tasks will be smooth to switch excuter when the strategy of the router choose ‘failover’;
- 6.Consistency: "Dispatch Center" through the DB lock to ensure the consistency of cluster distributed scheduling,one task excuted for once;
- 7.Custom task parameters: support online configuration scheduling tasks into the parameters, immediate effect;
- 8.Scheduling thread pool: scheduling system multi-threaded trigger scheduling operation, to ensure accurate scheduling, not blocked;
- 9.Elastic expansion capacity: once the new executor machine on the line or off the assembly line, the next time scheduling will be re-assigned tasks;
- 10.Mail alarm: the task fails to support e-mail alarm, support configuring multiple email addresses to send bulk alert messages;
- 11.Status monitoring: support real-time monitoring of the progress of the task;
- 12.Rolling execution log: support online view scheduling results, and support Rolling real-time view of the executer output of the complete implementation of the log;
- 13.GLUE: provide Web IDE, support online development task logic code, dynamic release, real-time compiler effective, omit the deployment of the on-line process. Supports historical versions of 30 versions back;
- 14.Data Encryption: The communication between the dispatching center and the executor is used for data encryption, Enhancing the security of dispatching information;
- 15.Task Dependency: Support configuration subtask dependencies, When the parent task executed end and after the success of the implementation will take the initiative to trigger a second task execution, multiple sub tasks are separated by commas;
- 16.Push the Maven central warehouse: The latest stable version will be sent to the Maven central warehouse to facilitate user access and use;
- 17.Task registration: The executor automatically registers tasks periodically, and the dispatch center automatically finds the registered tasks and triggers execution. It also supports manual input of executor address;
- 18.Router strategy: A rich routing strategy is provided when the executor cluster is deployed, these include: first, last, poll, random, consistent HASH, least frequently used, least recently used, failover, busy over, sharding broadcast,etc.;
- 19.Report monitor: Support real-time view of running data, such as the number of tasks, the number of dispatch, the number of executors, etc .; and scheduling reports, such as scheduling date distribution, scheduling success map;
- 20.Script task: Support the development and operation of script tasks in GLUE mode, including shell, Python and other types of script;
- 21.Blocking handling strategy: The scheduling is too dense and the executor is too late to handle. The strategy includes: single machine serial (default), discarding the following scheduling, and Override the previous scheduling;
- 22.Failure handling strategy:Handling strategy when scheduling fails, the strategy includes: failure alarm (default), failure retry;
- 23.Sharding broadcast task: When an executor cluster is deployed, task routing strategy select "sharding broadcast", a task schedule will broadcast all the actuators in the cluster to perform it once, you can develop sharding tasks based on sharding parameters;
24.Dynamic sharding: The sharding broadcast task is sharded by the executors to support the dynamic expansion of the executor cluster to dynamically increase the number of shardings and cooperate with the business handle; In the large amount of data operations can significantly improve the task processing capacity and speed.
1.3 Development
In 2015, I created the XXL-JOB project repository on github and submitted the first commit, followed by the system structure design, UI selection, interactive design ... In 2015 - November, XXL-JOB finally RELEASE the first big version of V1.0, then I will be released to OSCHINA, XXL-JOB OSCHINA won the popular recommendation of @红薯, the same period reached OSCHINA's " Popular move "ranked first and git.oschina open source software monthly heat ranked first, especially thanks for @红薯, thank you for the attention and support. In 2015 - December, I will XXL-JOB published to our internal knowledge base, and get internal colleagues recognized. In 2016 - 01 months, my company started XXL-JOB internal access and custom work, in this thank Yuan and Yin two colleagues contribution, but also to thank the internal other attention and support colleagues. In 2017-05-13, the link of "let the code run" in "the 62nd source of open source China Genesis" held in Shanghai,, I stepped on and made a speech about the XXL-JOB, five hundred spectators in the audience reacted enthusiastically (pictorial review).
My company have access to XXL-JOB, internal alias "Ferrari" (Ferrari based on XXL-JOB V1.1 version customization, new access application recommended to upgrade the latest version).
According to the latest statistics, from 2016-01-21 to 2017-07-07 period, the system has been scheduled about 600,000 times, outstanding performance. New access applications recommend the latest version, because after several major updates, the system's task model, UI interaction model and the underlying scheduling communication model has a greater optimization and upgrading, the core function more stable and efficient. So far, XXL-JOB has access to a number of companies online product line, access to scenes such as electronic commerce, O2O business and large data operations, as of 2016-07-19, XXL-JOB has access to the company But not limited to:
- 1、大众点评;
- 2、山东学而网络科技有限公司;
- 3、安徽慧通互联科技有限公司;
- 4、人人聚财金服;
- 5、上海棠棣信息科技股份有限公司
- 6、运满满
- 7、米其林 (中国区)
- 8、妈妈联盟
- 9、九樱天下(北京)信息技术有限公司
- 10、万普拉斯科技有限公司(一加手机)
- 11、上海亿保健康管理有限公司
- 12、海尔馨厨 (海尔)
- 13、河南大红包电子商务有限公司
- 14、成都顺点科技有限公司
- 15、深圳市怡亚通
- 16、深圳麦亚信科技股份有限公司
- 17、上海博莹科技信息技术有限公司
- 18、中国平安科技有限公司
- 19、杭州知时信息科技有限公司
- 20、博莹科技(上海)有限公司
- 21、成都依能股份有限责任公司
- 22、湖南高阳通联信息技术有限公司
- 23、深圳市邦德文化发展有限公司
- 24、福建阿思可网络教育有限公司
- 25、优信二手车
- 26、上海悠游堂投资发展股份有限公司
- 27、北京粉笔蓝天科技有限公司
- 28、中秀科技(无锡)有限公司
- 29、武汉空心科技有限公司
- 30、北京蚂蚁风暴科技有限公司
- 31、四川互宜达科技有限公司
- 32、钱包行云(北京)科技有限公司
- 33、重庆欣才集团
- 34、咪咕互动娱乐有限公司(中国移动)
- 35、北京诺亦腾科技有限公司
- 36、增长引擎(北京)信息技术有限公司
- ……
Welcome everyone's attention and use, XXL-JOB will also embrace changes, sustainable development.
1.4 Download
Source repository address (The latest code will be released in the two git warehouse in the same time)
| Source repository address | Release Download |
|---|---|
| https://github.com/xuxueli/xxl-job | Download |
| http://git.oschina.net/xuxueli0323/xxl-job | Download |
Center repository address (The latest Release version:1.8.1)
<!-- http://repo1.maven.org/maven2/com/xuxueli/xxl-job-core/ -->
<dependency>
    <groupId>com.xuxueli</groupId>
    <artifactId>xxl-job-core</artifactId>
    <version>1.8.1</version>
</dependency>
Blog address
Technical exchange group (technical exchange only)
- Group 6:399758605
- Group 5:138274130 (Group is full, please add group 6)
- Group 4:464762661 (Group is full, please add group 6)
- Group 3:242151780 (Group is full, please add group 6)
- Group 2:438249535 (Group is full, please add group 6)
- Group 1:367260654 (Group is full, please add group 6)
1.5 Environment
- JDK:1.7+
- Servlet/JSP Spec:3.1/2.3
- Tomcat:8.5.x/Jetty9.2.x
- Spring-boot:1.5.x/Spring4.x
- Mysql:5.6+
- Maven:3+
2. Quick Start
2.1 Init database
Please download project source code,get db scripts and execute, it will generate 16 tables if succeed.
The relative path of db scripts is as follows:
/xxl-job/doc/db/tables_xxl_job.sql
The xxl-job-admin can be deployed as a cluster,all nodes of the cluster must connect to the same mysql instance.
If mysql instances is deployed in master-slave mode,all nodes of the cluster must connect to master instace.
2.2 Compile
Source code is organized by maven,unzip it and structure is as follows:
xxl-job-admin:schedule admin center
xxl-job-core:public common dependent library
xxl-job-executor:executor Sample(Select appropriate version of executor,Can be used directly,You can also refer to it and transform existing projects into executors)
:xxl-job-executor-sample-spring:Spring version,executors managed by Spring,general and recommend;
    :xxl-job-executor-sample-springboot:Springboot version,executors managed by Springboot;
    :xxl-job-executor-sample-jfinal:JFinal version,executors managed by JFinal;
2.3 Configure and delploy "Schedule Center"
schedule center project:xxl-job-admin
target:Centralized management、Schedule and trigger task
Step 1:Configure Schedule Center
Configure file’s path of schedule center is as follows:
/xxl-job/xxl-job-admin/src/main/resources/xxl-job-admin.properties
The concrete contet describe as follows:
### JDBC connection info of schedule center:keep Consistent with chapter 2.1
xxl.job.db.driverClass=com.mysql.jdbc.Driver
xxl.job.db.url=jdbc:mysql://localhost:3306/xxl-job?useUnicode=true&characterEncoding=UTF-8
xxl.job.db.user=root
xxl.job.db.password=root_pwd

### Alarm mailbox
xxl.job.mail.host=smtp.163.com
xxl.job.mail.port=25
xxl.job.mail.username=ovono802302@163.com
xxl.job.mail.password=asdfzxcv
xxl.job.mail.sendFrom=ovono802302@163.com
xxl.job.mail.sendNick=《任务调度平台XXL-JOB》

### Login account
xxl.job.login.username=admin
xxl.job.login.password=123456

### TOKEN used for communication between the executor and schedule center, enabled if it’s not null
xxl.job.accessToken=
Step 2:Deploy:
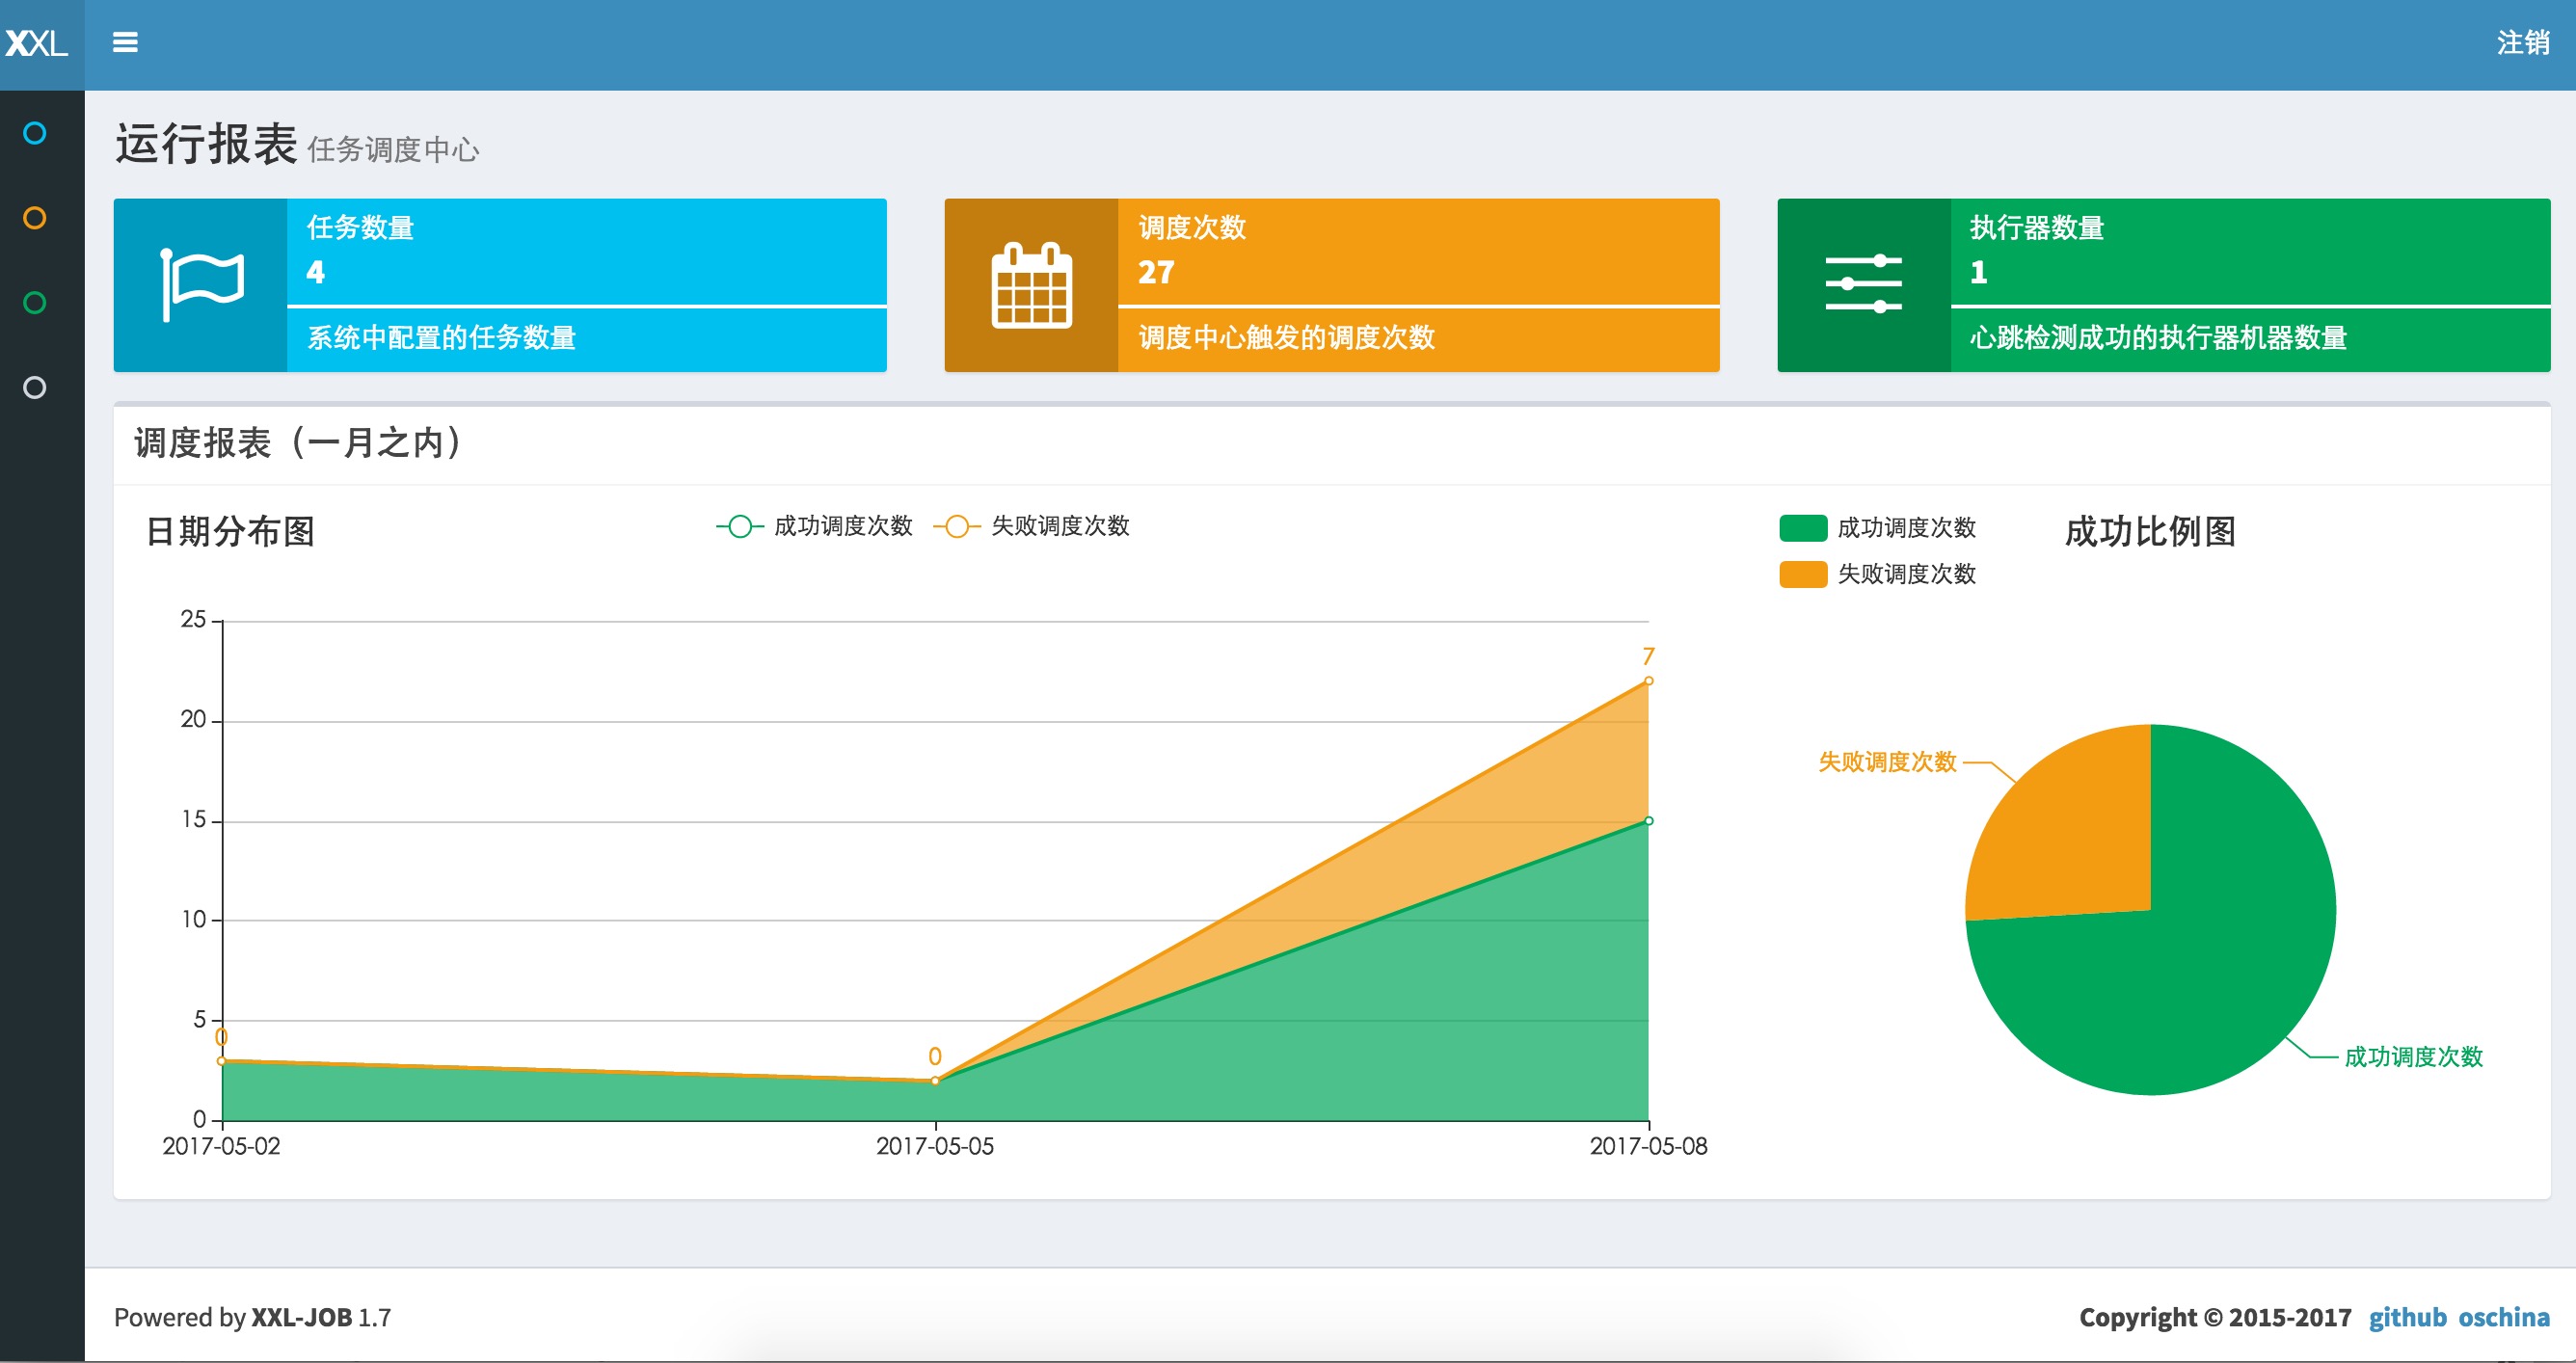
If you has finished step 1,then you can compile the project in maven and deploy the war package to tomcat. the url to visit is :http://localhost:8080/xxl-job-admin (this address will be used by executor and use it as callback url),the index page after login in is as follow
Now,the “xxl-job-admin” project is deployed success.
Step3:schedule center Cluster(Option):
xxl-job-admin can be deployed as a cluster to improve system availability.
Prerequisites for cluster is to keep all node configuration(db and login account info) consistent with each other. Different xxl-job-admin cluster distinguish with each other by db configuration.
xxl-job-admin can be visited through nginx proxy and configure a domain for nginx,and the domain url can be configured as the executor’s callback url.
2.4 Configur and Deploy "xxl-job-executor-example"
Executor Project:xxl-job-executor-example (if you want to create new executor project you can refer this demo);
Target:receive xxl-job-admin’s schedule command and execute it;
Step 1:import maven dependence
Pleast confirm import xxl-job-core jar in pom.xml;
Step 2:Executor Configuration
Relative path of the executor configuration file is as follows:
/xxl-job/xxl-job-executor-samples/xxl-job-executor-sample-spring/src/main/resources/xxl-job-executor.properties
The concret content of configuration file as follows:
### xxl-job admin address list:xxl-job-admin address list: Multiple addresses are separated by commas,this address is used for "heart beat and register" and "task execution result callback" between the executor and xxl-job-admin.
xxl.job.admin.addresses=http://127.0.0.1:8080/xxl-job-admin

### xxl.job.executor.appname is used to group by executors
xxl.job.executor.appname=xxl-job-executor-sample
### xxl.job.executor.ip :1,used to register with xxl-job-admin;2,xxl-job-admin dispatch task to executor through it;3,if it is blank executor will get ip automatically, multi network card need to be configured.
xxl.job.executor.ip=
### xxl.job.executor.port :the port of the executor runned by,if multiple executor instance run on the same computer the port must different with each other
xxl.job.executor.port=9999

### xxl-job log path:runtime log path of the job instance
xxl.job.executor.logpath=/data/applogs/xxl-job/jobhandler/

### xxl-job, access token:xxl-job access token,enabled if it not blank
xxl.job.accessToken=
Step 3:executor configuration
configure file path of executor:
/xxl-job/xxl-job-executor-samples/xxl-job-executor-sample-spring/src/main/resources/applicationcontext-xxl-job.xml
Concrete contet describe as follows:
<!-- configure 01、JobHandler scan path:auto scan JobHandler bean managed by container -->
<context:component-scan base-package="com.xxl.job.executor.service.jobhandler" />

<!-- configure 02、Excutor:executer core configure -->
<bean id="xxlJobExecutor" class="com.xxl.job.core.executor.XxlJobExecutor" init-method="start" destroy-method="destroy" >
    <!-- executor IP[required],auto get if it blank -->
    <property name="ip" value="${xxl.job.executor.ip}" />
    <!-- executor port[required] -->
    <property name="port" value="${xxl.job.executor.port}" />
    <!-- executor AppName[required],auto register will be closed if it blank -->
    <property name="appName" value="${xxl.job.executor.appname}" />
    <!-- register center address of executor [required],auto register will be closed if it blank -->
    <property name="adminAddresses" value="${xxl.job.admin.addresses}" />
    <!-- log path of executor[required] -->
    <property name="logPath" value="${xxl.job.executor.logpath}" />
    <!-- access token, match check enabled if it not blank[required] -->
    <property name="accessToken" value="${xxl.job.accessToken}" />
</bean>
Step 4:deploy executor project
You can compile and package the project If have done all the steps above successfully,the project supply two executor demo projects,you can choose any one to deploy:
xxl-job-executor-sample-spring:compile and package in WAR,can be deployed to tomcat;
xxl-job-executor-sample-springboot:compile and package in JAR,and run in springboot mode;
Now you have deployed the executor project.
Step 5:executor cluster(optional)
In order to improve system availability and job process capacity,executor project can be deployed as cluster.
Prerequisites:keep all node’s configuration item "xxl.job.admin.addresses" exactly the same with each other,all executors can be register automatically.
2.5 Start first job "Hello World"
Now let’s create a "GLUE模式(Java)" job,if you want to learn more about it , please see “chapter 3:Task details”。( "GLUE模式(Java)"'s code is maintained online through xxl-job-admin,compare with "Bean模式任务" it’s not need to develop, deploy the code on the executor and it’s not need to restart the executor, so it’s lightweight)
Prerequisites:please confirm xxl-job-admin and executor project has been deployed successfully.
Step 1:Create new job
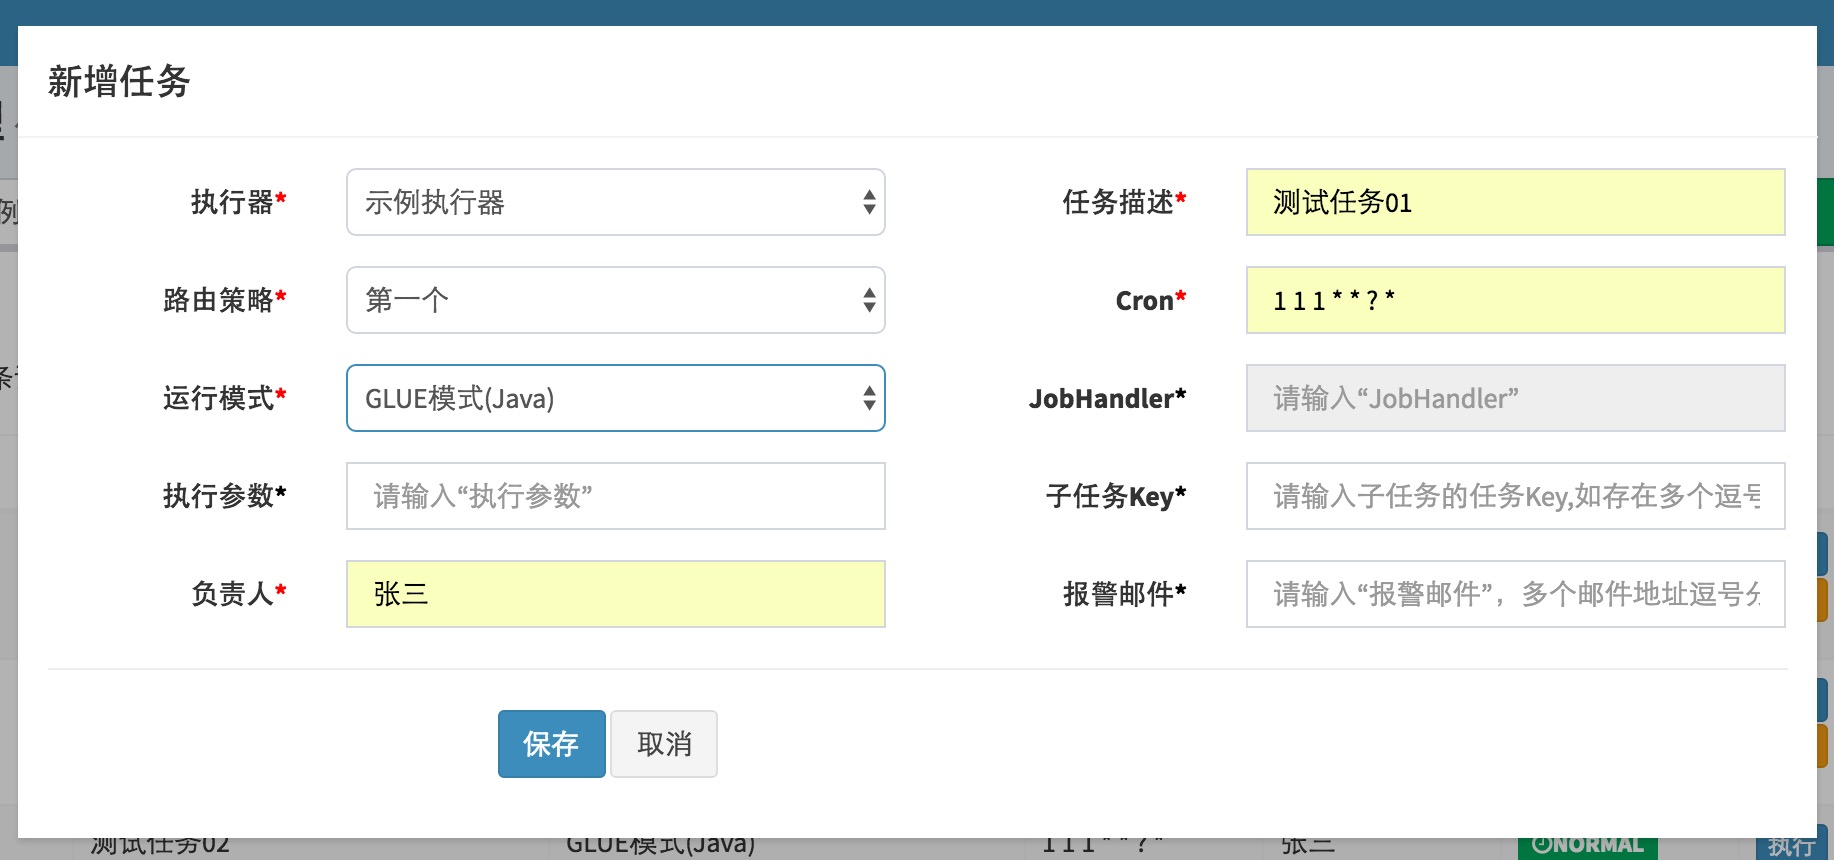
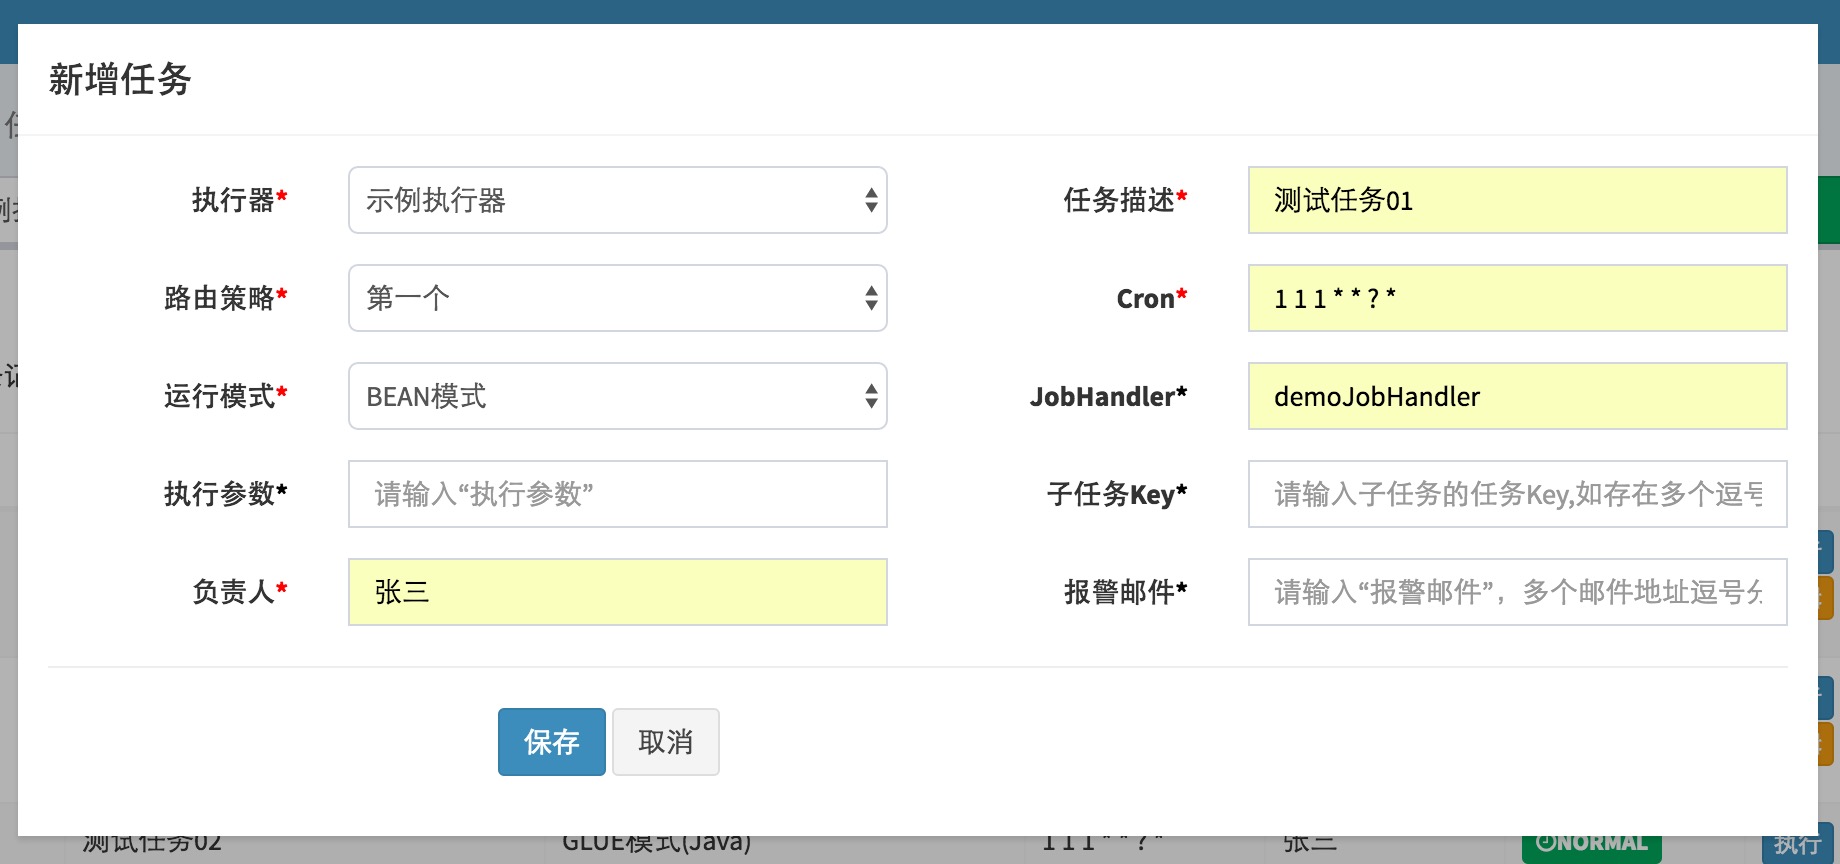
Login in xxl-job-admin,click on the"新建任务" button, configure the job params as follows and click "保存" button to save the job info.
Step 2:develop “GLUE模式(Java)” job
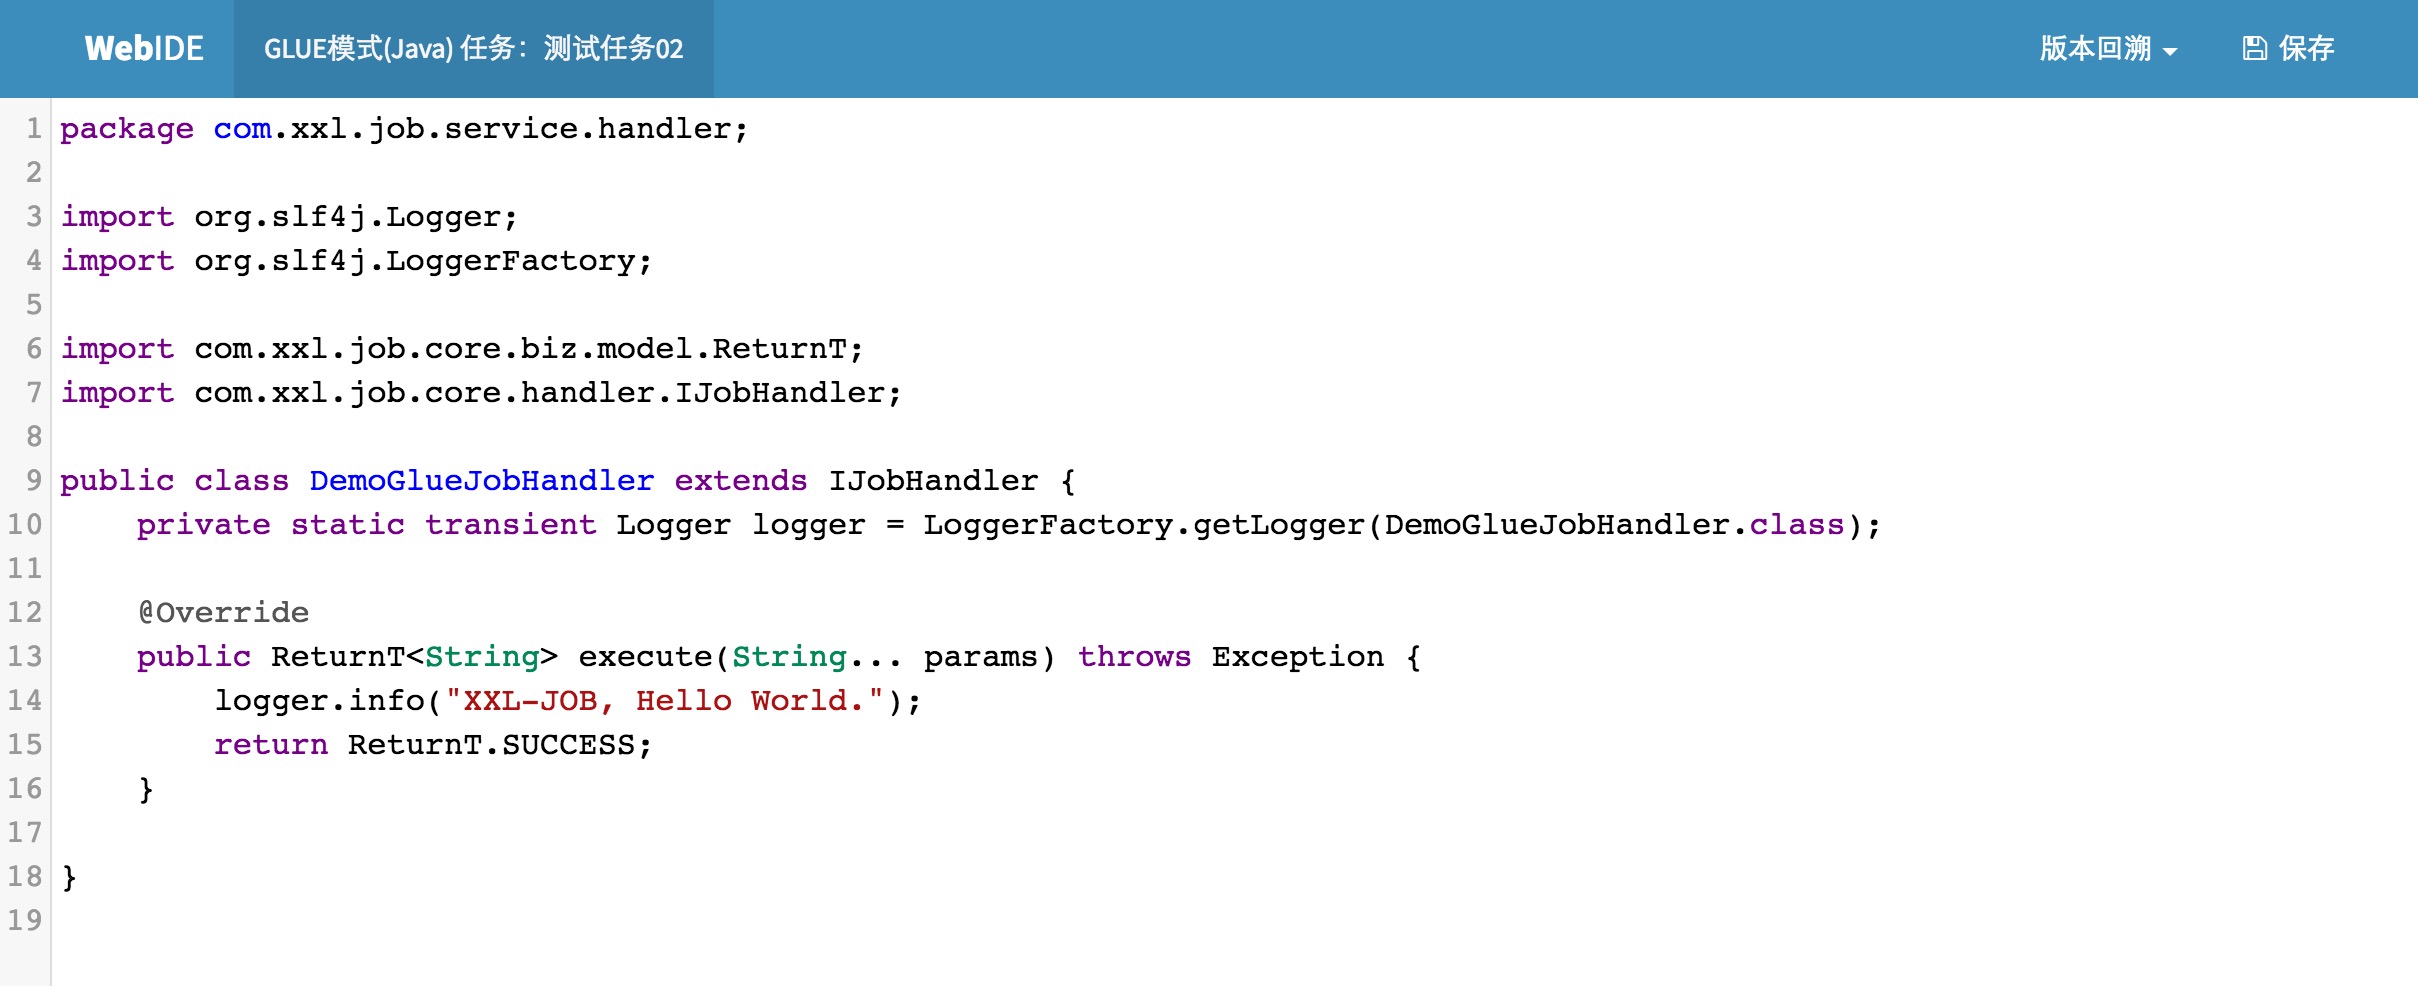
Click “GLUE” button on the right of the job to go to GLUE editor view as shown below。“GLUE模式(Java)” mode task has been inited with default task code for printing Hello World。 ( “GLUE模式(Java)” mode task is a java code fragment implements IJobHandler interface,it will be executed in executor,you can use @Resource/@Autowire to inject other java bean instance,if you want to see more info please go to chapter 3)
Step 3:trigger task
If you want to run the job manually please click "执行" button on the right of the job(usually we trigger job by Cron expression)
Step 4:view log
Click “日志” button on the right side of the task you will go to the task log list ,you will see the schedule history records of the task and the schedule detail info,execution info and execution params.If you click the “执行日志” button on the right side of the task log record,you will go to log console and view the execute log in the course of task execution.
On the log console,you can view task execution log on the executor immediately after it dump to log file,so you can monitor the task execution process by Rolling way.
3. Task details
Description of configuration item:
- 执行器:the container where job executed in,it will be discovered automaticly if it has registered success when job was scheduled,and the job will be executed automaticly through this way.On the other side all tasks was grouped by this way.Tasks must be binded to a executor and it can be configured on "执行器管理"  page;
- 描述:the decription of task
- 路由策略:when executors deployed as a cluster,it can configure multi route policys,include:
    FIRST(第一个):default select the first executor;
    LAST(最后一个):default select the last executor;
    ROUND(轮询):round select the executor;;
    RANDOM(随机):random select the executor;
    CONSISTENT_HASH(一致性HASH):all jobs was evenly scheduled on different machines,make sure load balance of executors under the same group and the same job will be scheduled to the same machine.
    LEAST_FREQUENTLY_USED(最不经常使用):default select the least often used executor.
    LEAST_RECENTLY_USED(最近最久未使用):defalut select the longest not used executor.
    FAILOVER(故障转移):beat with the executor in order and select the first beat success executor as target executor.
    BUSYOVER(忙碌转移):check the executor busy or not in order,the first executor checked not busy is to be select as the target scheduled executor.
    SHARDING_BROADCAST(分片广播):broadcast all executor nodes under the same executor group execute the job, slice number will be transferred at the same time,shard task will be executed accordate with the shard number.

- Cron:Cron expression used to trigger job execution;
- 运行模式:
    BEAN模式:job was maintained on the side of executor by  as JobHandler instance,it will be executed accordate with "JobHandler" properties.
    GLUE模式(Java):task source code is maintened in the schedule center,it must implement IJobHandler and explain by "groovy" in the executor instance,inject other bean instace by annotation @Resource/@Autowire.
    GLUE模式(Shell):it’s source code is a shell script and maintained in the schedule center.
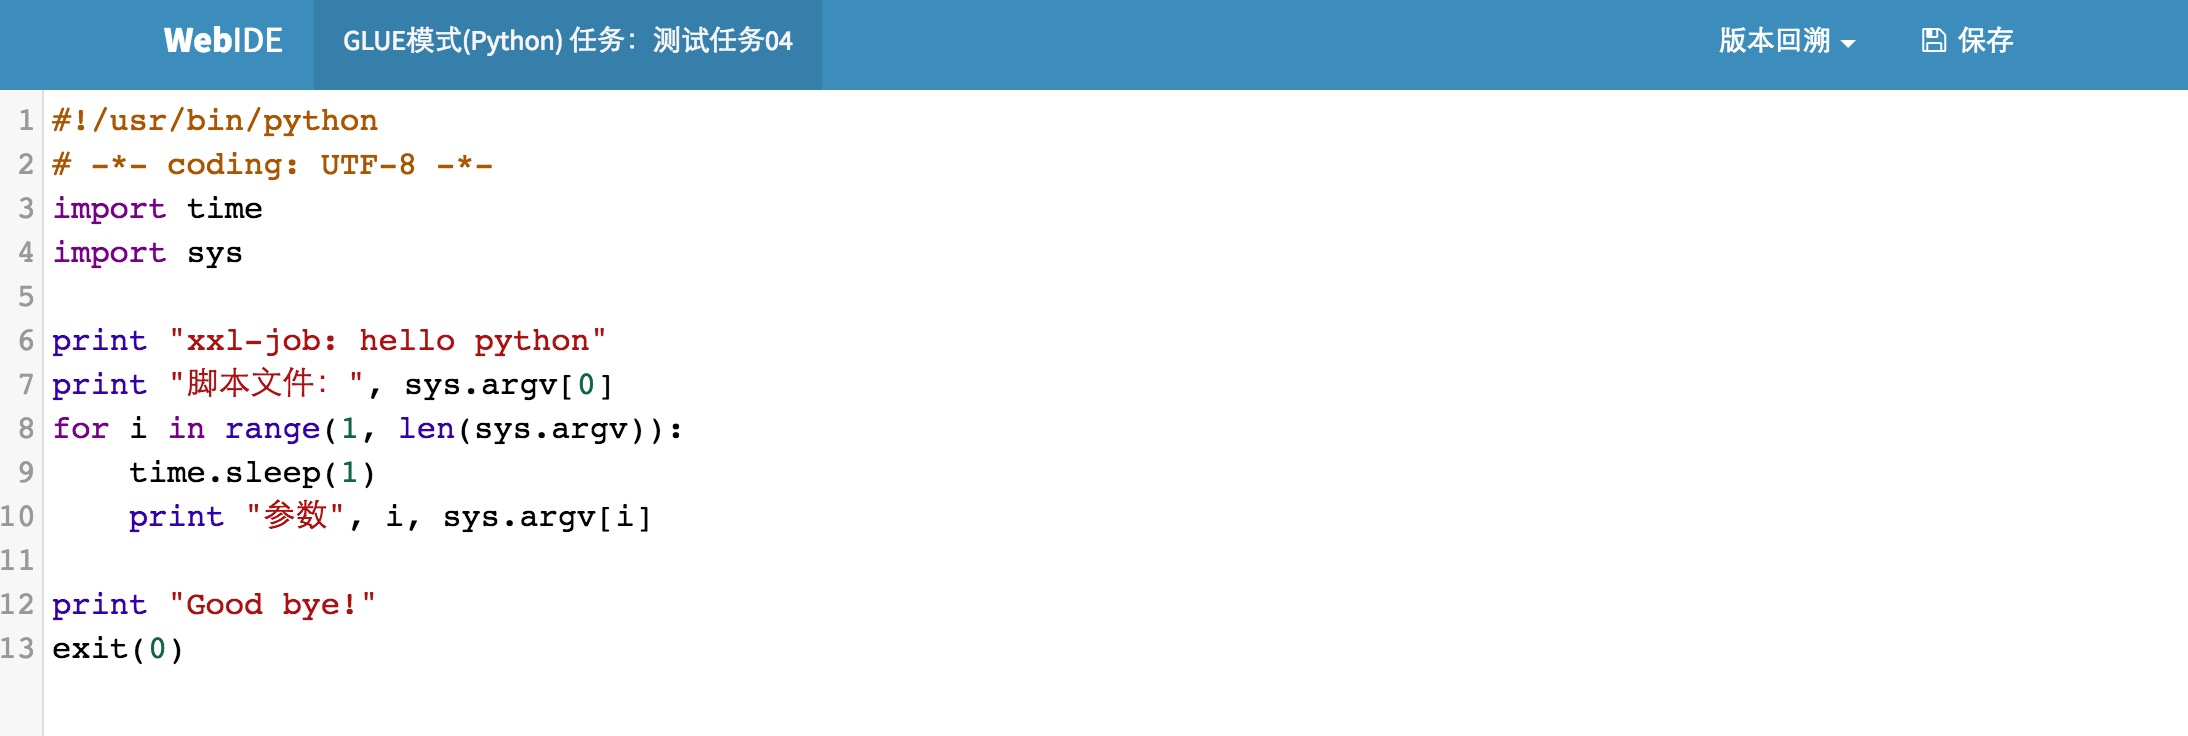
    GLUE模式(Python):it’s source code is a python script and maintained in the schedule center.
- JobHandler:it’s used in  "BEAN模式",it’s instance is defined by annotation @JobHander on the JobHandler class name.
- 子任务Key:every task has a unique key (task Key can acquire from task list),when main task is done successfully it’s child task stand for by this key will be scheduled.
- 阻塞处理策略:the stategy handle the task when this task is scheduled too frequently and the task is block to wait for cpu time.
    单机串行(默认):task schedule request go into the FIFO queue and execute serially.
    丢弃后续调度:the schedule request will be discarded and marked as fail when the same task’s  instance scheduled befor is running in the target executor.
    覆盖之前调度:the schedule request will be executed and clear before task queue when the same task’s  instance scheduled befor is running in the target executor.
- 失败处理策略:handle policy for schedule fail
    失败告警(默认):it will trigger alarm such as send alarm mail when it’s scheduled fail.
    失败重试:it will try another time when it’s scheduled fai,if try fail it will trigger alarm for fail.every time it will trigger a new schedule request.
- 执行参数:the params needed in the run time of the task, multiple values are separated by commas,it will be passed to task instace as an array when task is scheduled.
- 报警邮件:the email used to receive the alarm mail when task is scheduled fail or execute fail, multiple values are separated by commas.
- 负责人:The person name response for the task.
3.1 BEAN模式
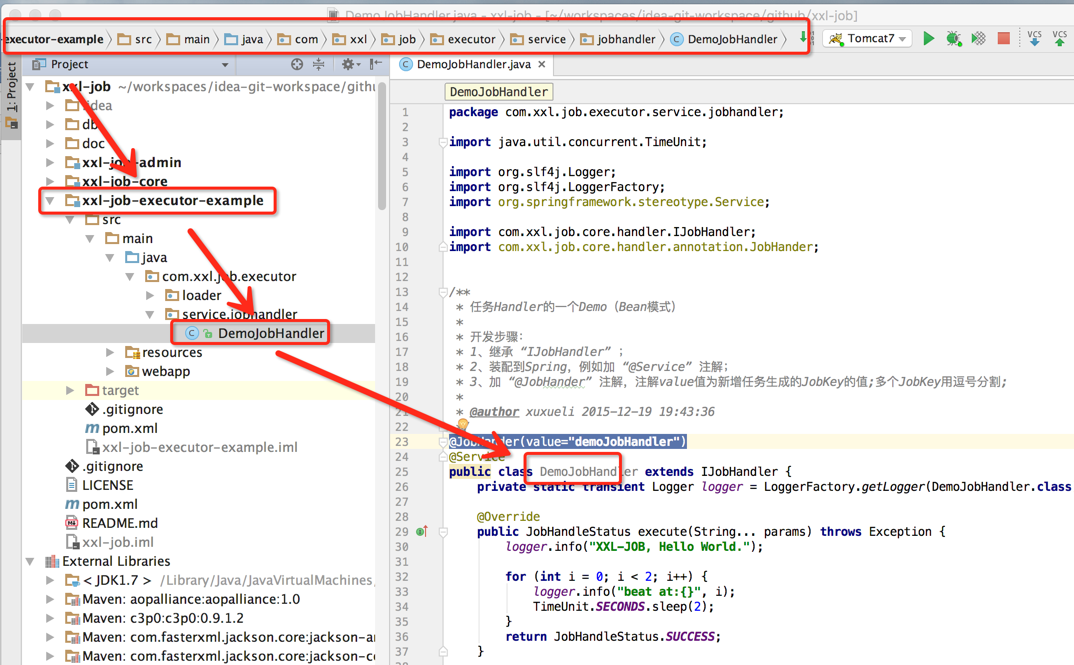
The task logic exist in the executor project as JobHandler,the develop steps as shown below:
Step 1:develp obHandler in the executor project
- 1, create new java class implent com.xxl.job.core.handler.IJobHandler;
- 2, if you add @Component annotation on the top of the class name it’s will be managed as a bean instance by spring container;
- 3, add  “@JobHander(value=" customize jobhandler name")” annotation,the value stand for JobHandler name,it will be used as JobHandler property when create a new task in the schedule center.
(go and see DemoJobHandler in the xxl-job-executor-example project, as shown below)
Step 2:create task in schedule center
If you want learn more about configure item please go and sedd “Description of configuration item”,select "BEAN模式" as run mode,property JobHandler please fill in the value defined by @JobHande.
3.2 GLUE模式(Java)
Task source code is maintained in the schedule center and can be updated by Web IDE online, it will be compiled and effective real-time,didn’t need to assign JobHandler,develop flow shown as below:
Step 1:create task in schedule center
If you want learn more about configure item please go and sedd “Description of configuration item”,select "GLUE模式(Java)" as run mode.
Step 2:develop task source code
Select the task record and click “GLUE” button on the righe of it,it will go to GLUE task’s WEB IDE page,on this page yo can edit you task code(also can edit in other IDE tools,copy and paste into this page).
Version backtrack(support 30 versions while backtrack):on the WEB IDE page of GLUE task,on upper right corner drop down box please select “版本回溯”,it will display GLUE updated history,select the version you want it will display the source code of this version,it will backtrace the version while click save button.
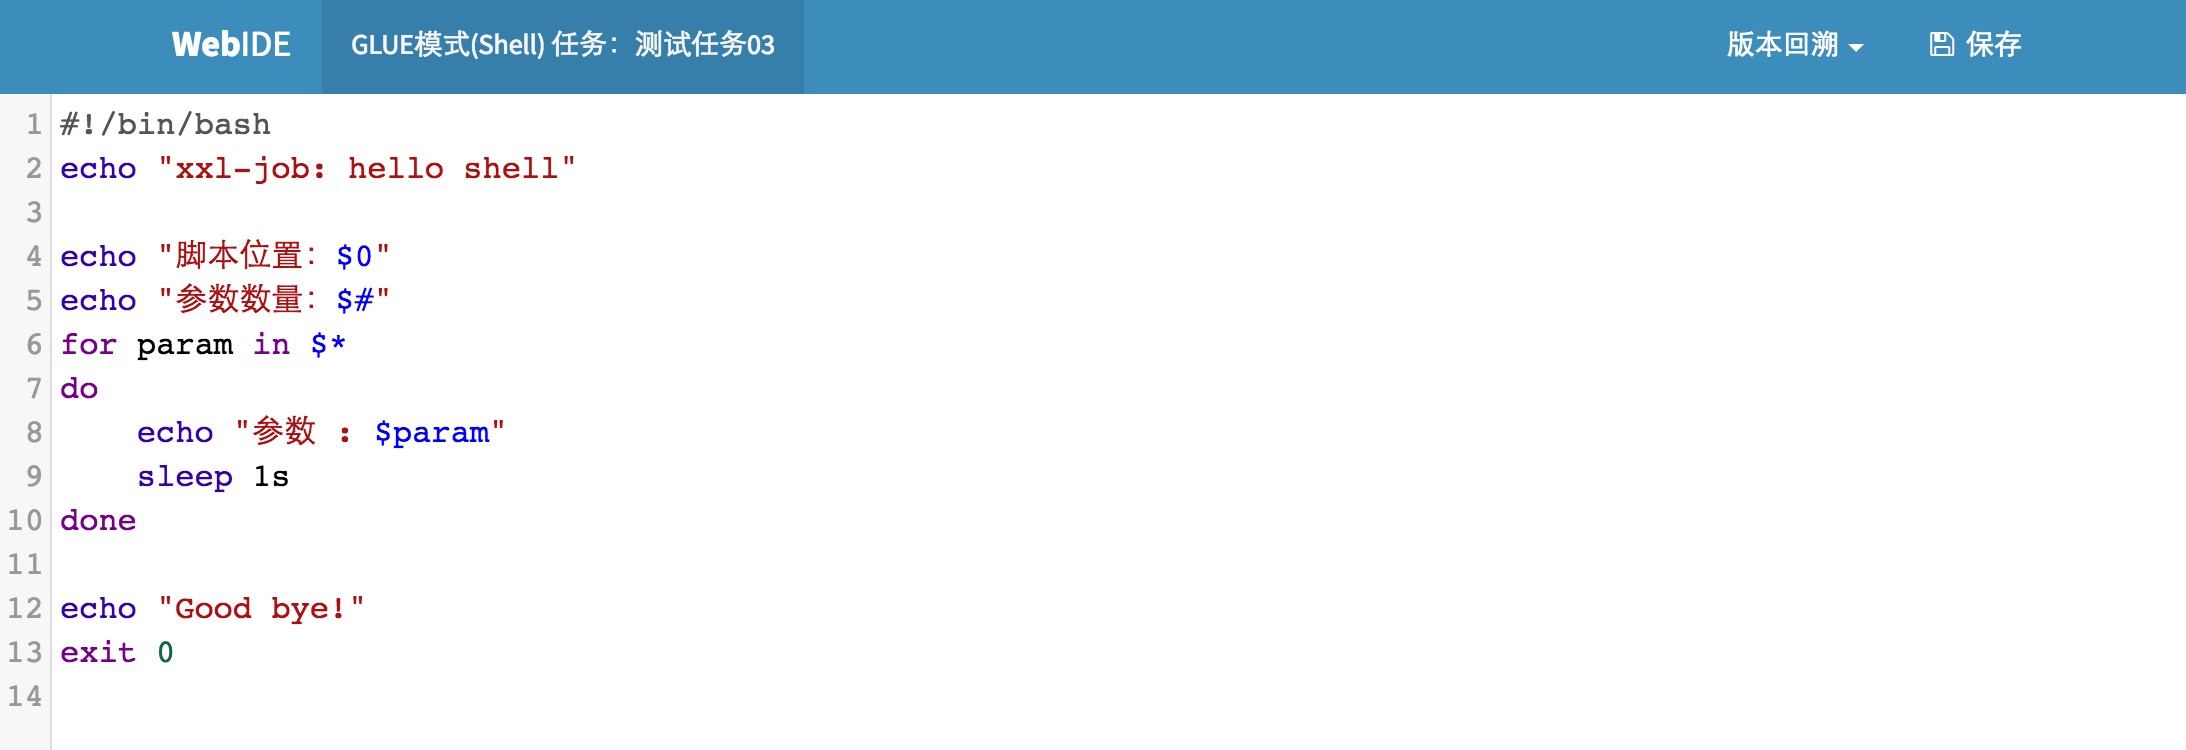
3.3 GLUE模式(Shell)
Step 1:create new task in schedule center
If you want learn more about configure item please go and sedd “Description of configuration item”,select "GLUE模式(Shell)"as run mode.
Step 2:develop task source code
Select the task record and click “GLUE” button on the righe of it,it will go to GLUE task’s WEB IDE page,on this page yo can edit you task code(also can edit in other IDE tools,copy and paste into this page).
Actually it is a shell script fragment.
3.4 GLUE模式(Python)
Step 1:create new task in schedule center
If you want learn more about configure item please go and sedd “Description of configuration item”,select "GLUE模式(Python)"as run mode.
Step 2:develop task source code
Select the task record and click “GLUE” button on the righe of it,it will go to GLUE task’s WEB IDE page,on this page yo can edit you task code(also can edit in other IDE tools,copy and paste into this page).
Actually it is a python script fragment.
4. Task Management
4.0 configure executor
click"执行器管理" on the left menu,it will go to the page as shown below:

1,"调度中心OnLine”:display schedule center machine list,when task is scheduled it will callback schedule center for notify the execution result in failover mode, so that it can avoid a single point scheduler; 2,"执行器列表" :display all nodes under this executor group.
If you want to create a new executor,please click "+新增执行器" button:
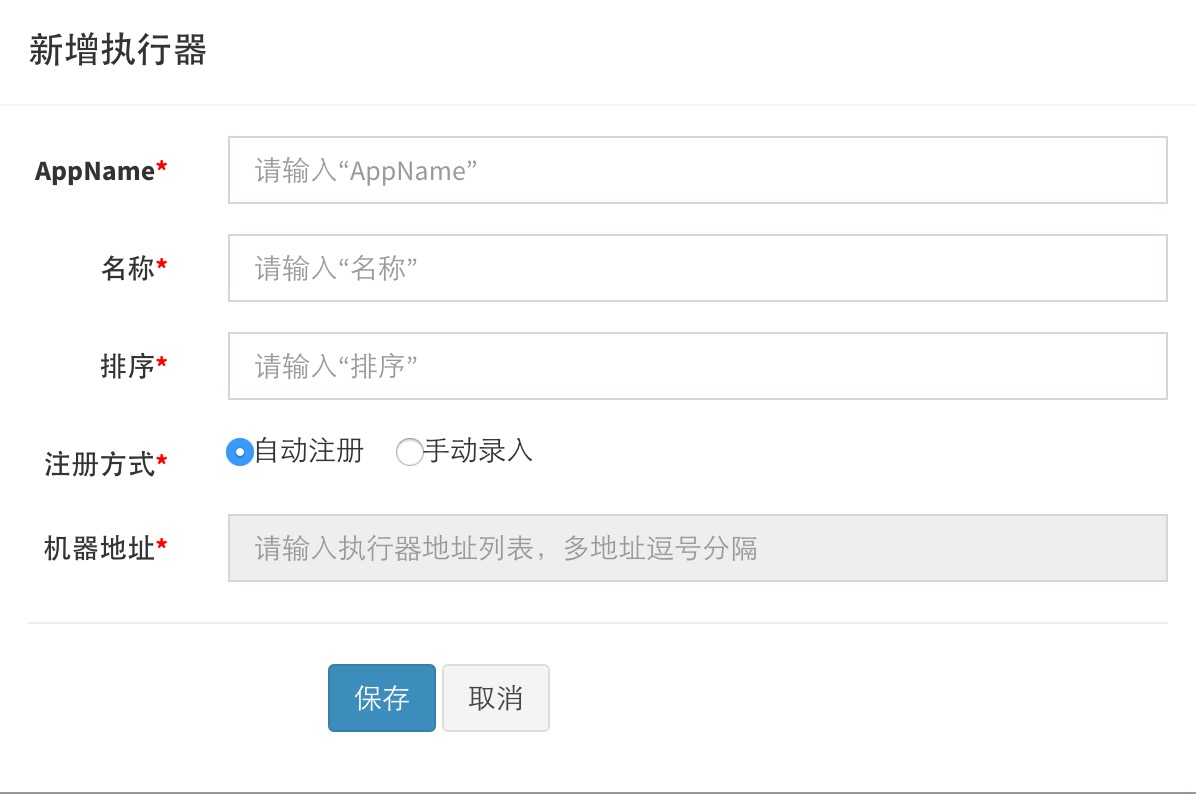
Description of executor attributes
AppName: the unique identity of the executor cluster,executor will registe automatically and periodically by appName so that it can be scheduled.
名称: the name of ther executor,it is used to describe the executor.
排序: the order of executor,it will be used in the place where need to select executor.
注册方式:which way the schedule center used to acquire executor address through;
    自动注册:executor will register automatically,through this schedule center can discover executor dynamically.
    手动录入:fill in executor address manually and it will be used by schedule center, multiple address separated by commas.
机器地址:only effective when "注册方式" is "手动录入",support fill in executor address manually.
4.1 create new task
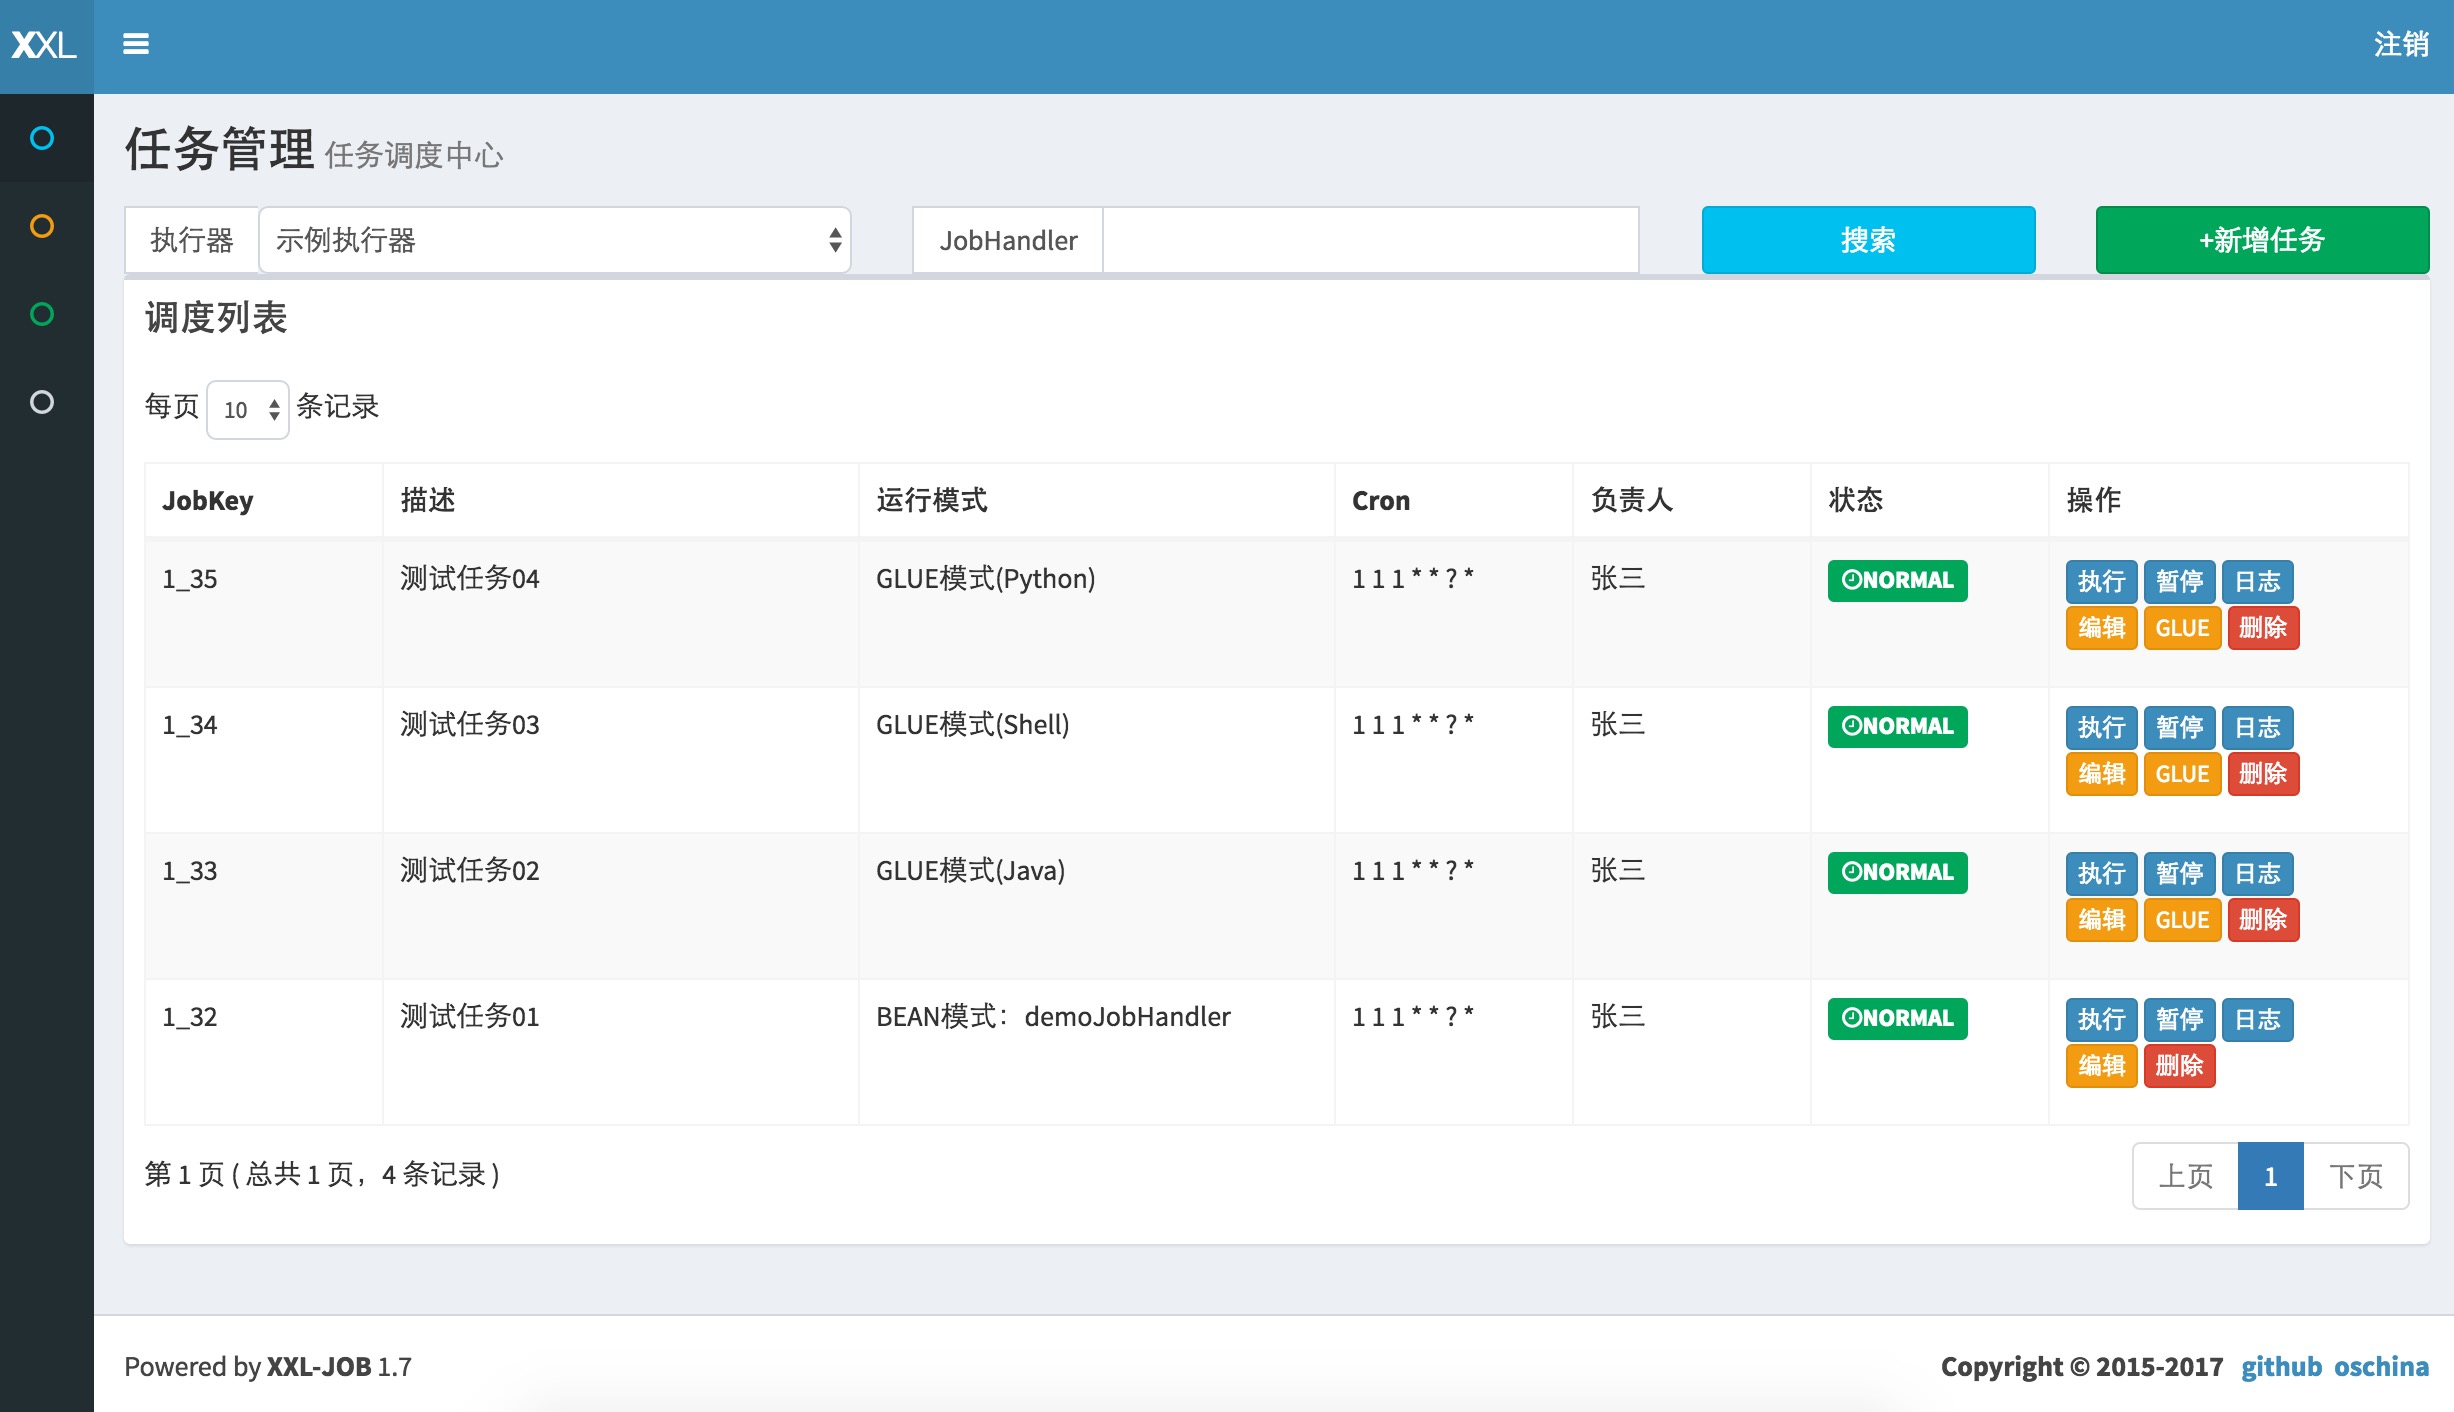
Go to task management list page,click “新增任务” button on the upper right corner,on the pop-up window“新增任务”page configure task property and save.learn more info please go and see "3,task details".
4.2 edit task
Go to task management list page and choose the task you want to edit ,click”编辑”button on the right side of the task,on the pop-up window “编辑任务”page edit task property and save.
4.3 edit GLUE source code
Only fit to GLUE task.
choose the task you want to edit and click” GLUE”button on the right side of the task, it will go to the Web IDE page of GLUE task,then you can edit task source code on this page.you can read "3.2 GLUE模式(Java)" for more info.
4.4 pause/recover task
You can pause or recover task but it just fit to follow up schedule trigger and won’t affect scheduled tasks,if you want to stop tasks which has been triggered,please go and see “4.8 stop the running task”
4.5 manually trigger
You can trigger a task manually by Click “执行”button,it won’t affect original scheduling rules.
4.6 view schedule log
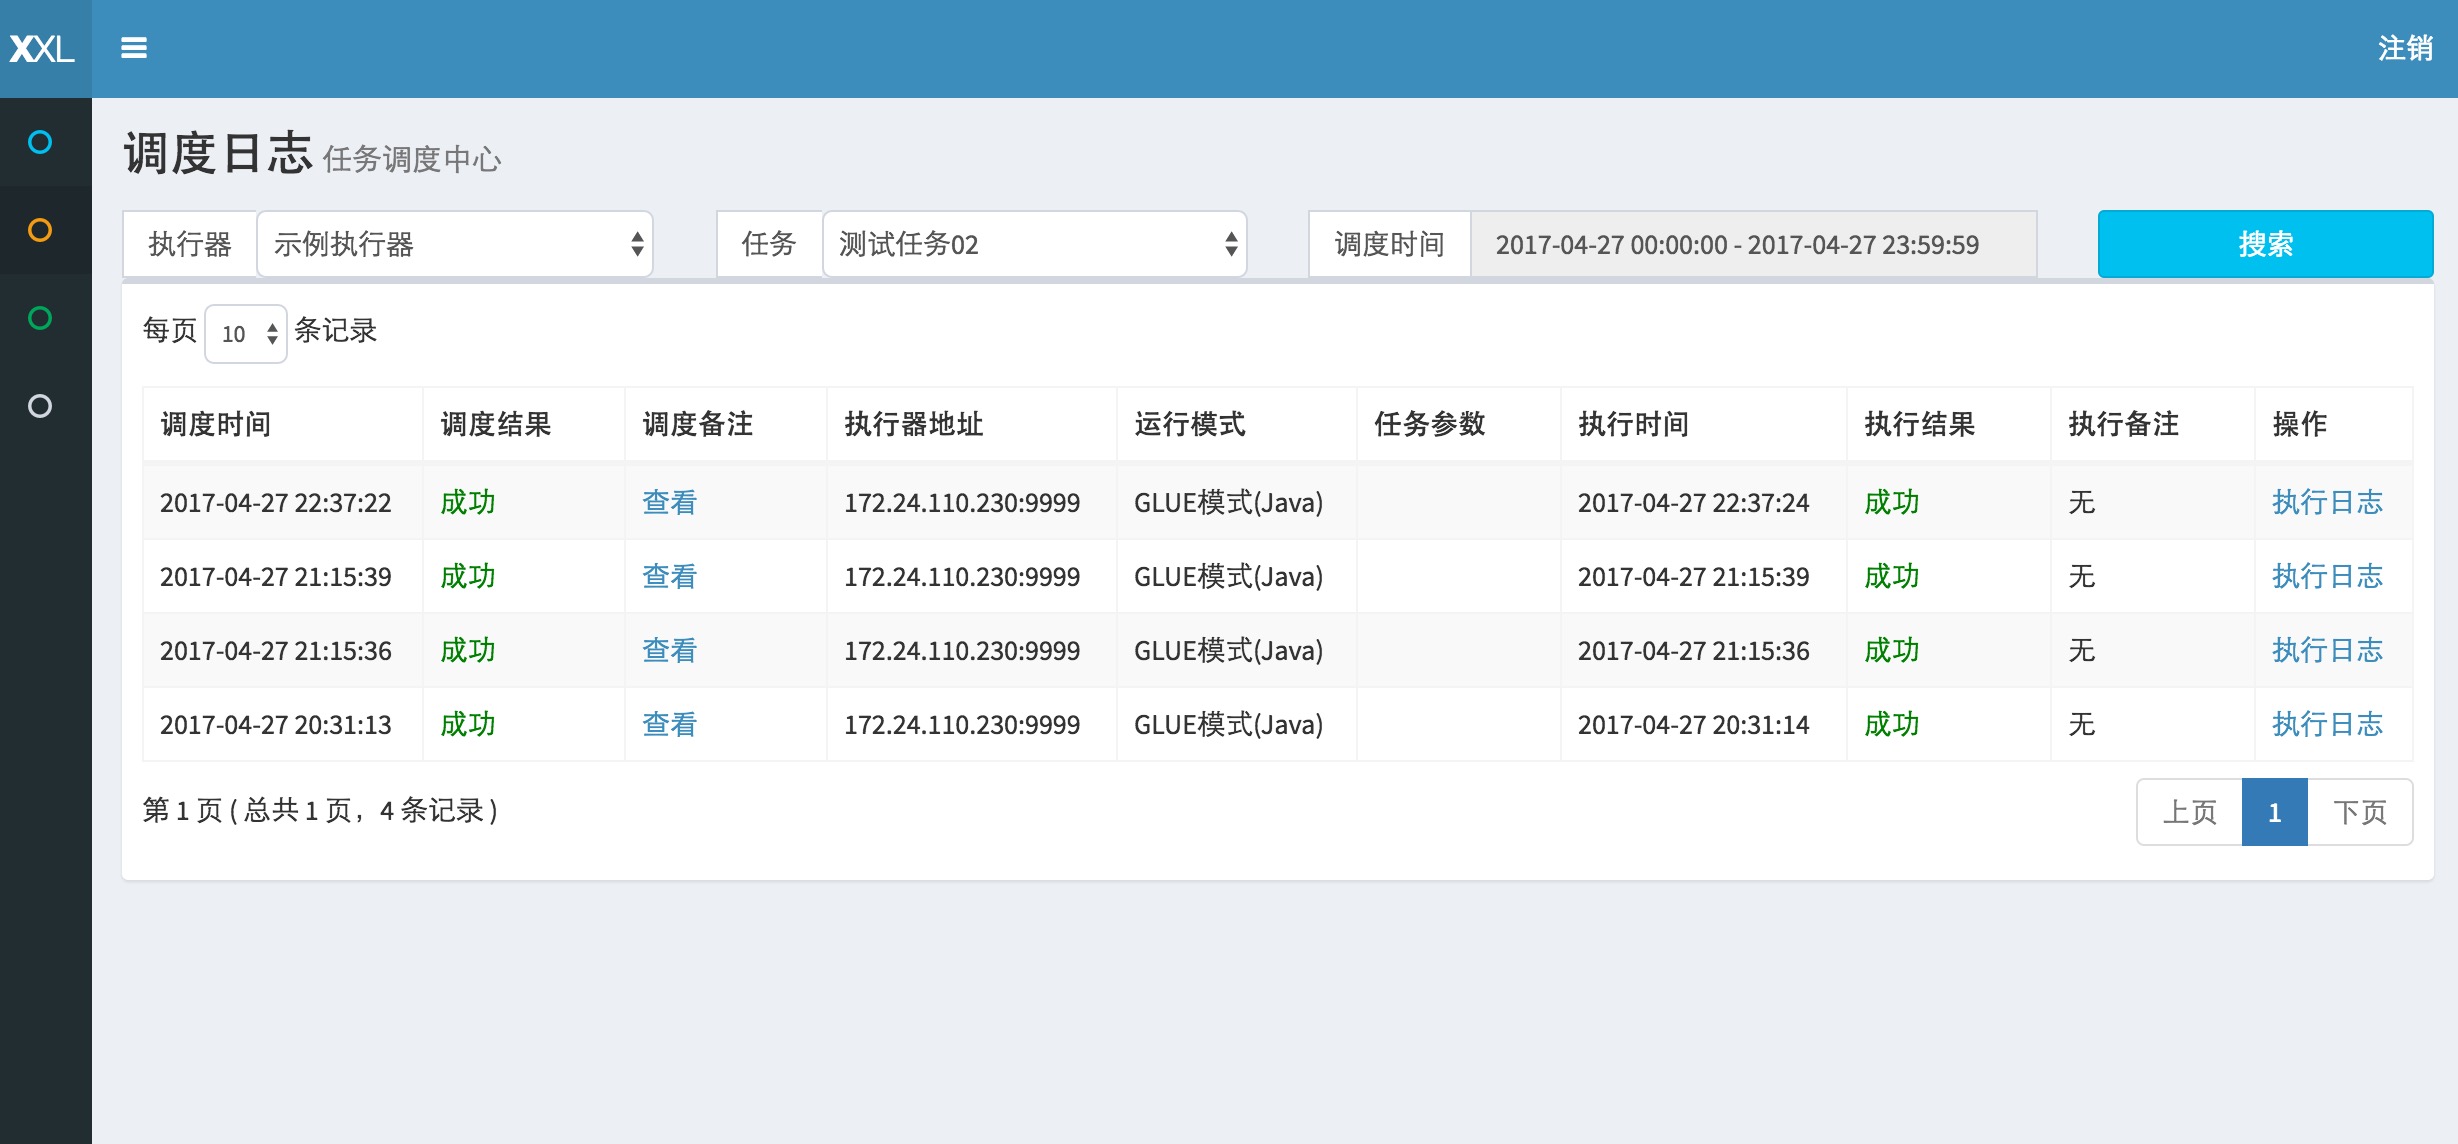
You can view task’s history schedule log by click “日志” button,on the history schedule log list page you can view every time of task’s schedule result,execution result and so on,click “执行日志” button can view the task’s full execute log.
调度时间:schedule center trigger time when schedule and send execution signal to executor;
调度结果:schedule center trigger task’s result, 200 represent success,500 or other number stands for fail;
调度备注:schedule center trigger task’s remark info;
执行器地址:the machine address where the task was executed;
运行模式:run mode of triggered task,go and see  "3,Task Details" for more info;
任务参数:the input params of the executed task;
执行时间:the callback time task was done in the executor;
执行结果:task’s execute result in the executor, 200 represent success,500 or other number stands for fail;
执行备注:task’s execute remark info in the executor;
操作:
    "执行日志"button:click this button you can view task’s execution detail log,go and see chapter 4.7 “view execution log” for more info;
    "终止任务"button:click this button you can stop the task’s execution thread on this executor,include bloked task instance which didn’t has started;
4.7 view execution log
Click the “执行日志” button on the right side of the record,you can go to the execution log page,you can view the full execution log of the logic business code, shown as below:
4.8 stop running tasks
Just fit to running tasks,on the task log list page,click “终止任务” button on the right side of the record, it will send stop command to the executor where the task was executed,finally the task was killed and the task instance execute queue of this task will be clear.
It is implemented by interrupt execute thread, it will trigger InterruptedException.so if JobHandler catch this execuption and handle this exception this function is unavailable.
So if you want stop the running task ,the JobHandler need to handle InterruptedException separately by throw this exception.the right logic is as shown below:
try{
    // TODO
} catch (Exception e) {
    if (e instanceof InterruptedException) {
        throw e;
    }
    logger.warn("{}", e);
}
If JobHandler start child thread,child thread also must not catch InterruptedException,and it should throw exception.
4.9 delete execution log
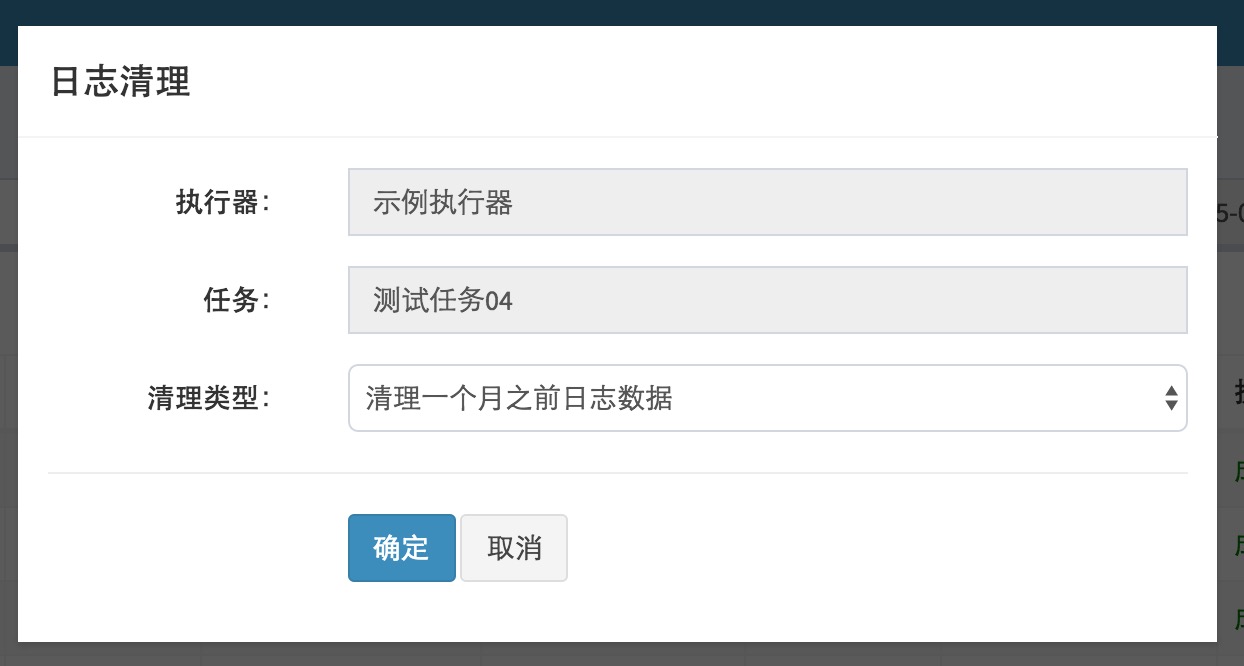
On the task log list page, after you select executor and task, you can click"删除" button on the right side and it will pop-up "日志清理" window,on the pop-up window you can choose different log delete policy,choose the policy you want to execute and click "确定" button it will delele relative logs:

4.10 delete task
Click the delete button on the right side of the task,the task will be deteted.
5. Overall design
5.1 Source directory introduction
- /doc :documentation and material
- /db :db scripts
- /xxl-job-admin :schedule and admin center
- /xxl-job-core :common core Jar
- /xxl-job-executor-samples :executor,Demo project(you can develop on this demo project or adjust your own exist project to executor project)
5.2 configure database
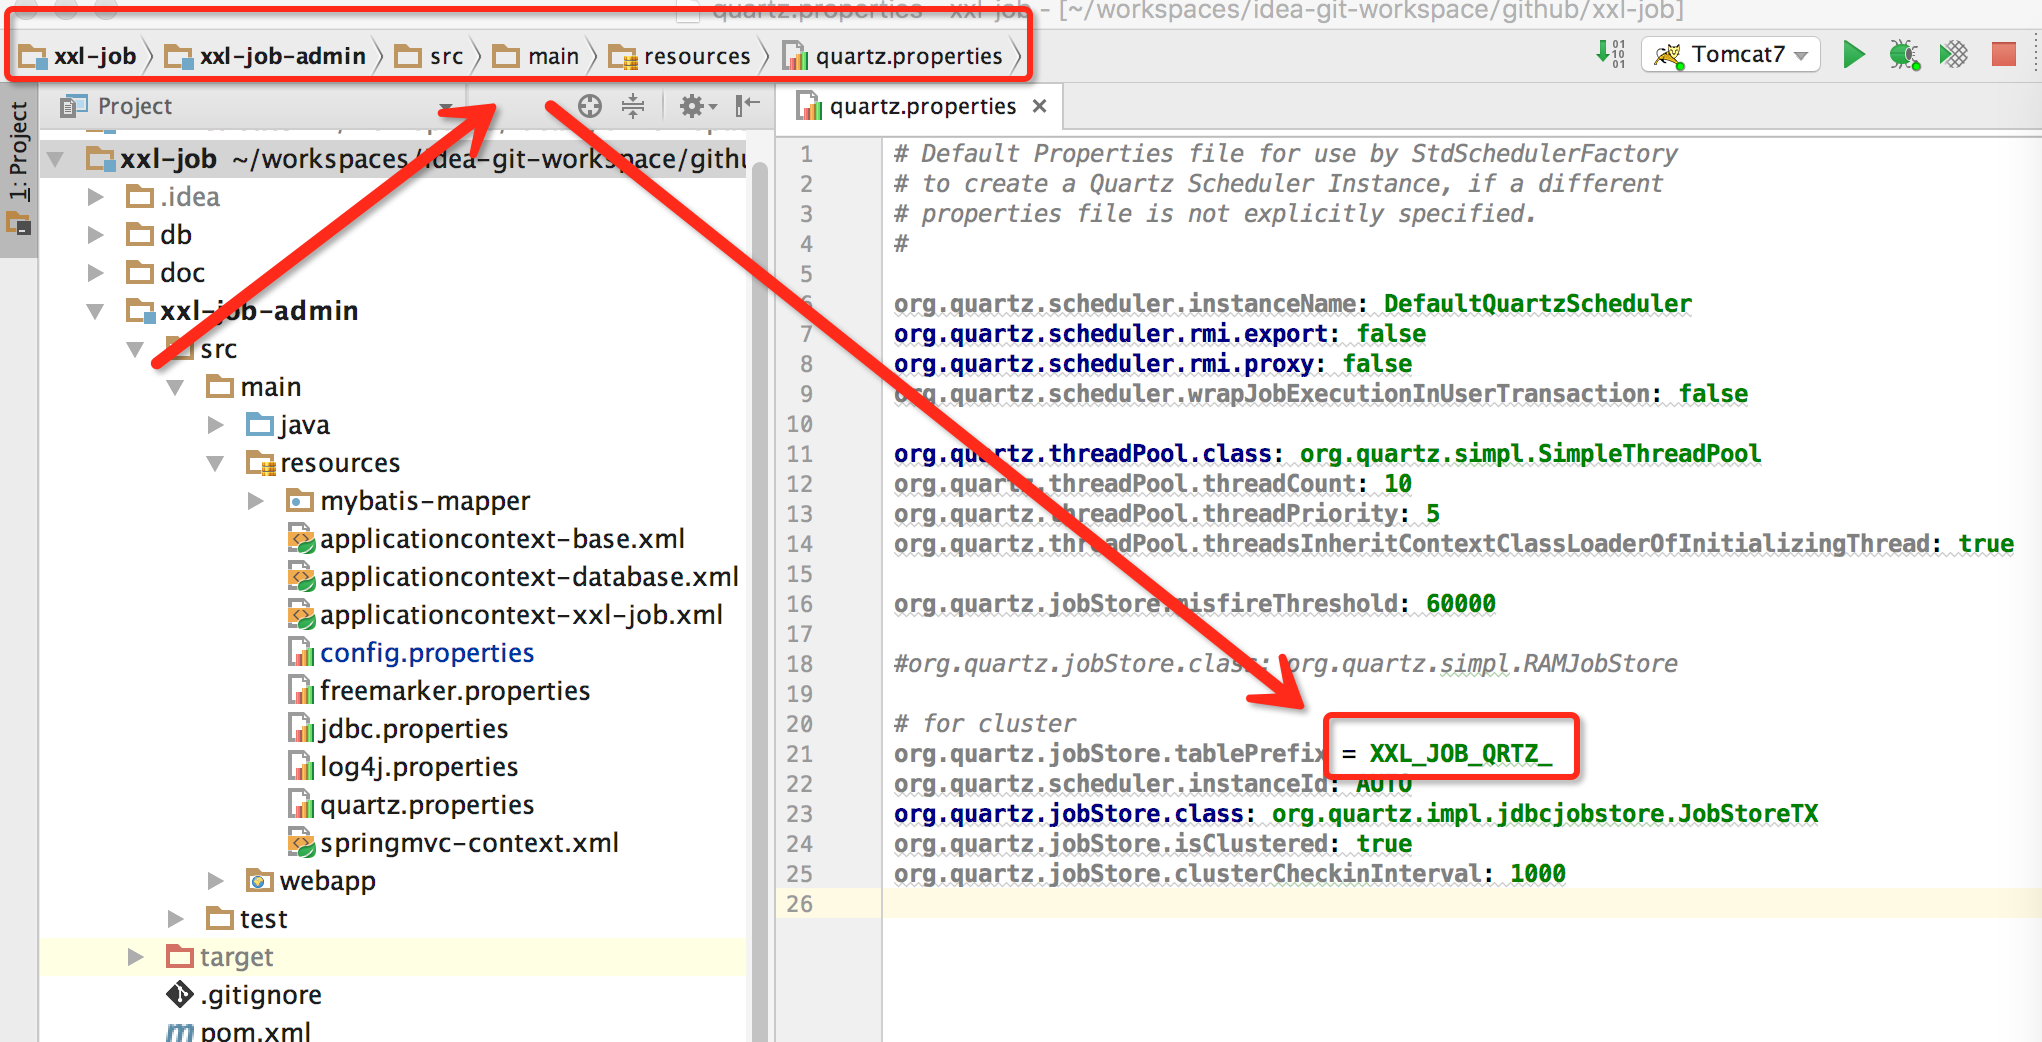
XXL-JOB schedule module is implemented based on Quartz cluster,it’s “database” is extended based on Quartz’s 11 mysql tables.
XXL-JOB custom Quartz table structure prefix(XXL_JOBQRTZ).
然后,在此基础上新增了几张张扩展表,如下:
- XXL_JOB_QRTZ_TRIGGER_GROUP:执行器信息表,维护任务执行器信息;
- XXL_JOB_QRTZ_TRIGGER_REGISTRY:执行器注册表,维护在线的执行器和调度中心机器地址信息;
- XXL_JOB_QRTZ_TRIGGER_INFO:调度扩展信息表: 用于保存XXL-JOB调度任务的扩展信息,如任务分组、任务名、机器地址、执行器、执行入参和报警邮件等等;
- XXL_JOB_QRTZ_TRIGGER_LOG:调度日志表: 用于保存XXL-JOB任务调度的历史信息,如调度结果、执行结果、调度入参、调度机器和执行器等等;
- XXL_JOB_QRTZ_TRIGGER_LOGGLUE:任务GLUE日志:用于保存GLUE更新历史,用于支持GLUE的版本回溯功能;
因此,XXL-JOB调度数据库共计用于16张数据库表。


